Everyone likes a shiny new tool, but, more often than not, people tend to have a trusty go-to for most jobs. For me and programming, that was Notepad++. It has been over 15 years since I wrote my first webpage is plain old notepad. Then, sometime later, I found Notepad++ and syntax highlighting. So simple. So powerful.
I’ve been working with PowerShell for a couple years now, and, despite poking around at other tools like Komodo Edit and Atom, I still defaulted back to Notepad++. Even when PowerShell ISE was updated in version 3, I just couldn’t quite swing over. Notepad++ had speed, extensibility, and some seriously awesome find, replace, and text manipulation tools right out of the box. Intellisense and an awkward ISE console were not enough to dethrone my old standard.
Then I found ISESteroids 2.0. It extends PowerShell ISE with tools like variable monitoring, code refactoring, snippet management, version control, etc…
Note: For a full list of features, see the Feature Overview on the ISESteroids website.
I always preach to use the right tool for the job, and I think PowerShell ISE + ISESteroids is absolutely the best tool for creating, editing, and analyzing PowerShell scripts. I wanted to highlight a couple of those features, so today we’ll be taking a look at Risk Analysis and Code Signing in ISESteroids.
Risk Analysis
When we talk about risk analysis, you may wonder what good that does you. After all, you created your PowerShell scripts. You, of all people, understand what your script is doing, right?
But what if you didn’t write it? In this day and age we, as technologists in our field, find great pleasure in sharing code to the world. We also like reusing or modifying something existing to fit our purpose. No reinventing the wheel and all that. But do you trust everything you download? You shouldn’t.
If you download a script that’s less than 20 lines of code you can probably glance over it and get a good idea of what’s going on, but what happens when it’s 400+ lines? How long would it take you to read through that and pinpoint any areas of concern? That’s where risk analysis in ISESteroids could really come in handy.
Walkthrough
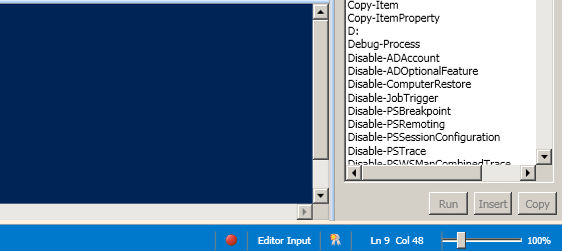
The indicator that a script may contain dangerous code is a red circle at the bottom of the ISE window.
If you hover over that button you will see a tool tip with information like this:

If there is more than 1 risk detected, the tooltip will specify that. If you click on the red button, you will get a menu like this:
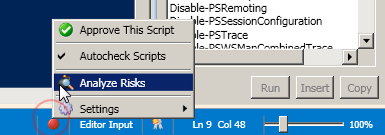
You’ll notice a couple of options here.
- Approve Script
- Autocheck Scripts
- Analyze Risks
- Settings
Autocheck Scripts is on by default. If you would rather ISESteroids not do automatic risk analysis, you can simply click to turn it off. Right now, we’re going to Analyze Risks.
This will bring up a new window. See below:

Notice that it tells you which line the risk is on, and why that particular cmdlet is concerning. This one is for the “Remove-Item” cmdlet, which is inherently dangerous because it deletes things… Permanently.
Dismissing the risk will only do so for this script. If you were to open another script with the Remove-Item command in it, it would be flagged again. What if we decided that a cmdlet wasn’t risky at all? We could Whitelist it.

Now lets take a look at the Risk Manager. This is where you would go to manually view and/or modify how ISESteroids defines risk.
Click on the red button again, but this time go to Settings –> Manage Black/White Lists…
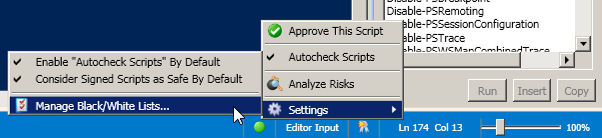
And you’ll be greeted by a window like this:
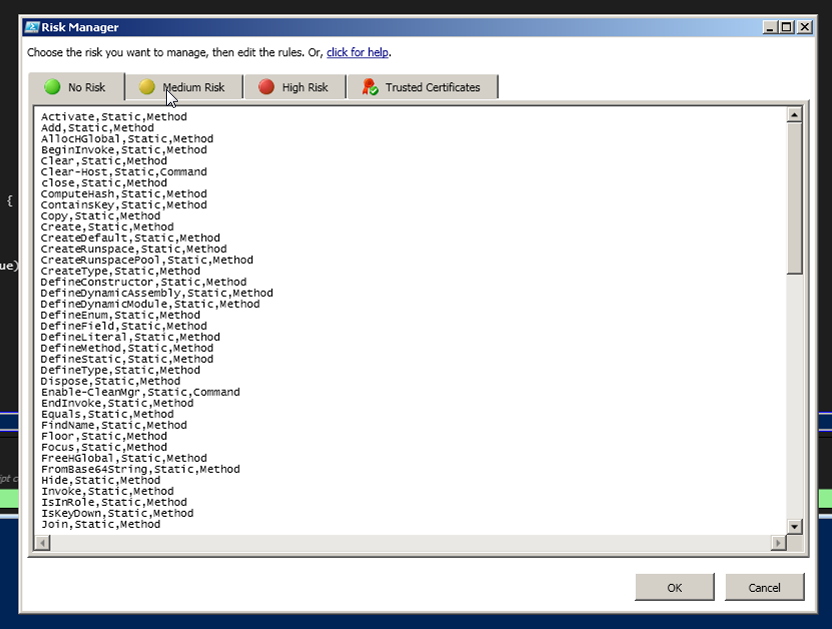
You can see that there are 3 lists.
- No Risk
- Medium Risk
- High Risk
No Risk is your WhiteList; ISESteroids will assume everything there is perfectly safe. The other two are Blacklists with varying degrees of severity. These fields are just editable text. You can add, remove, or modify anything in there. I t hink a “Reset to Default” might not be a bad idea in case of “Oops”, or you just want to clear everything custom out. For that reason I copied these into text files as backups just in case.
That’s pretty much covers the basics of Risk Analysis, so now a quick cover of.. .
Code Signing with Certificates
So you want to restrict your environment to only run signed certificates? That process is not the most accessible. It takes a bit of know how, not only to create a code signing certificate, but to then make sure your script is signed (especially if you edit it after you’ve already signed it). It’s not impossible, though, and there are many blog posts out there on how to accomplish it. So what does ISESteroids bring to the table?
How about automatic certificate creation and digital signing with the click of a button?
Walkthrough
First you’ll need to find the Digital Signature button. It’s down on the status bar, just to the right of the Risk Analysis button.
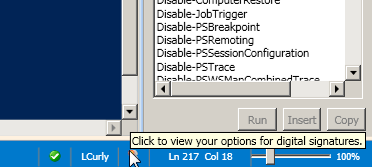
If you click this button you will get a menu like this:
- Apply Signature
- Advanced Options
We’re not going to look at any advanced options right now, so click Apply Signature. If you do not already have any certificates, it will bring up the Create Certificate window.
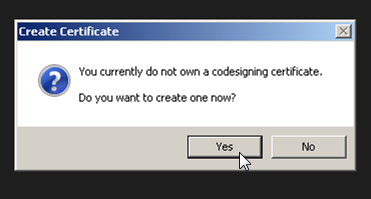
Click Yes to proceed and you will be given another window to actually create your certificate.
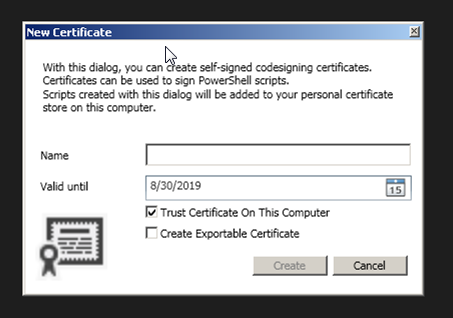
There are two fields you can fill in and a couple of check boxes:
Name: You can put anything here, but if it’s for work purposes you may want to come up with an identifiable moniker for your certificate.
Valid Until: This is the expiration date for the certficate. After this date scripts will need to be resigned.
Trust Certificate On This Computer: A useful option that is selected by default. This will automatically set the certificate to trusted so you can begin using it immediately on the local computer.
Create Exportable Certificate: If you’re serious about using this certificate to restrict code in your entire environment, you will want to check this box. This will allow you to use the certificate file in a tool like Group Policy so you can trust the certificate across an entire domain.
Once you are done filling that in, click Create. A Security Warning window will come up.
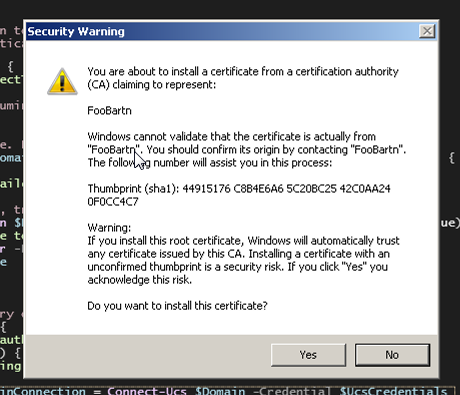
The warning refers to the fact that you just create a self-signed certificate. You can see that I named my certificate FooBartn. Windows is letting me know that it has no idea who FooBartn is, and I should make sure I do before trusting their certificate.
Since FooBartn is me… We’re all good here. Do take care installing certificates from untrusted sources, though.
Click Yes and you will be presented with a window where you can select a certificate.
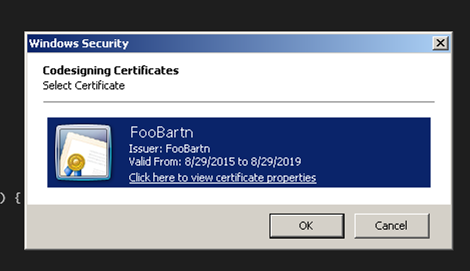
If you already had a certificate earlier, when we first clicked Apply Signature, this is where it would’ve brought you to. We only have one certificate, so click OK.
That’s it. Your script is now digitally signed with your very own certificate.
If you take a look at the Digital Signature button on the status bar again, you will see that it has turned into a red ribbon. Click on it and you will see a couple different options:
- Remove Signature
- Apply New Signature
If you were to edit your script, the Digital Signature icon would change again. The tooltip will read “You signed the script, but then edited it. The script content no longer matches the signature. Save file to update signature, or click for more options.
Save the file and Voila, your script has been re-signed. Spiffy, eh?
That’s all for now. Hopefully you found this useful and it assists you in providing a more secure scripting environment for your business!