UPDATES
- 06.02.2018: Updated Basic Syntax Differences
- @MarkeKraus recently pointed out that I probably missed a good chance to tell you about the differences in case sensitivity between C# and PowerShell. I added a little information in the syntax section that will hopefully help. Thanks, Mark!
Intro
So you’re a PowerShell-er, but you’re interested in doing something with C#? Awesome! I’m here to help. I’m not going to go deep in the weeds in this series, but I’m going to see if I can get you from point A to point B with brief explanations inbetween. It’ll be up to you to take it the rest of the way ^__^
If you’ve never poked around PowerShell classes at all, or you want a much more in depth look at how they work you might want to visit: Powershell v5 Classes & Concepts by Michael Willis. Most of the concepts carry over to C# very well.
Prerequisites
I’m going to be using Visual Studio (not Code) for this, but you’re welcome to use what you please. The C# plugin for Code gets better all the time, and the dotnet new commands can be used to scaffold new projects. Do what works best for you!
Basic Syntax Differences
Powershell
- Expressions do not need to be closed with a semi-colon.
- Comparisons are two letter combinations: lt, le, gt, ge, -eq
- String interpolation is handled for you inside double quotes:
- “My name is $Name”
- Parameters are added through a param block inside the function
- Parameters do not require a type. They will infer a type based on input.
- Case insensitive
- $MyVariable and $myvariable are the same thing
- Get-Process and get-process are the same thing
C#
- Expressions must be closed with a semi-colon.
- Comparisons use math operators: <, <=, >, >=, ==
- String interpolation is slightly more complex:
- $”My name is {name}”
- Parameters are specified inside the () after a method name
- C# is a strongly typed language, and thus requires a type specification on parameters.
- Case sensitive
- MyVariable and myVariable are not the same thing.
- GetProcess and getprocess would not get you to the same method.
- Technically this is a general naming rule violation, but I’m just using it to make a point.
A PowerShell Base
So what we’re going to do is turn a PowerShell function into a .Net core console app. We’re going to sort of breeze over the “Class” part at the moment. Most of you likely use more functions than classes in your PowerShell, so it’s an easier thing to wrap your head around at the start. If you’ve used PowerShell classes quite a bit, this should all be very familiar to you.
PowerShell function:
function Get-Response {
    param(
        $Name,
        $Number
    )

    $MyName = "brAIn"

    "Hello $Name"
    "My name is $MyName"
    "You asked me to count to $Number. Here goes!"

    for ($i=0; $i -le $Number; $i++) {
        "$i"
    }
}
And the output:
Simple enough, right? We’re going to take input parameters Name and Number, and we’re going to write some stuff back to the console for the user to read.
Let’s see how we’d get a similar result out of C#.
C# Console App
- Open Visual Studio, and go to File -> New -> Project (or Ctrl + Shift + N).
- Choose Console App (.NET Core)
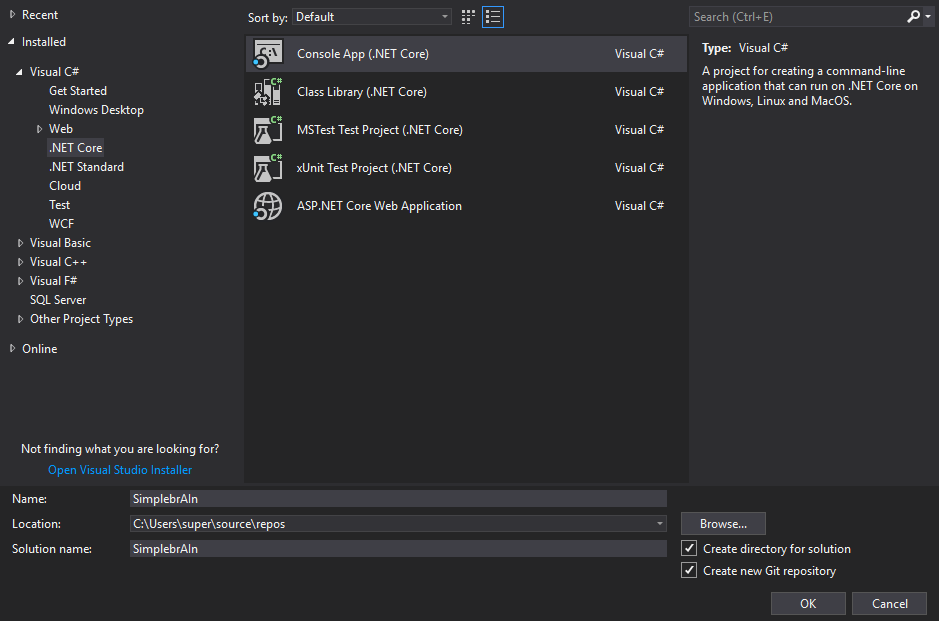
Visual Studio will create a new project for you, and will put you on the default Program.cs file that looks like this:
using System;

namespace SimplebrAIn
{
    class Program
    {
        static void Main(string[] args)
        {
            Console.WriteLine("Hello World!");
        }
    }
}
Lets walk through this:
using System;
Have you ever imported a module in PowerShell? Something like:
Import-Module ActiveDirectory
That’s what the using statement is. It’s importing libraries so that you can use their functionality. In this case we need System so that we can use the Console.WriteLine() method. Another option, if we didn’t want to put using System at the top, would be modify the code to look like this:
namespace SimplebrAIn
{
    class Program
    {
        static void Main(string[] args)
        {
            System.Console.WriteLine("Hello World!");
        }
    }
}
Now we’re using the system namespace directly to be able to call Console.WriteLine(). If I only ever use the Console.WriteLine() once, and I don’t use System for anything else, this might be okay. But if you need to use a library multiple times throughout your code, it’s going to be more concise to add the using statement up top.
namespace SimplebrAIn
This is essentially how your program knows where everything is. The main namespace is the name of your application. If I created a folder in this project named Models and put another cs file in there, its namespace would be SimplebrAIn.Models. And from Program.cs I would need to add a using SimplebrAIn.Models to be able to access the classes in that namespace. We’ll get to that another time. Just understand that this is how your application knows where all the pieces to your app exist.
class Program
Everything in C# starts with a class. Classes are where all the things happen. In this case, our main class is called “Program”. This is the entry point to our application. This is where, when you press run, the application will begin processing.
Inside a class you can have private variables, methods, etc. We’ll get into constructors and more advanced things later on. For now lets take a look at methods.
static void Main(string[] args)
Methods are the real equivalents of our PowerShell functions. In this case the method we start with is called Main. Just as class Program is the class this application will start in, Main is the method it will start with.
Notice that Main has two keywords proceeding it.
-
The first is the word static. The static keyword on a class means it can’t be instantiated as an object. The static keyword on a method means that it can be accessed directly without needing an instance of the class created.
-
The second keyword is void. This is the return type of the method. We can return any kind of data: string, int, custom class, etc. Void means that we’re returning absolutely nothing. We’re just going to do a thing and be done.
Main also takes parameters in the form of an array of strings with a variable name of “args”.
Inside main we have our single action: A call to Console.WriteLine() with the argument “Hello World!”. Running this as it is now will simply write Hello World! to the console and exit gracefully.
Our New Method
We’re going to write another method, equivalent to our PowerShell function, and we’re going to call it inside main.
So we’ll need to start with something like this:
namespace SimplebrAIn
{
    class Program
    {
        static void Main(string[] args)
        {
            System.Console.WriteLine("Hello World!");
        }

        private void GetResponse (string name, int number)
        {

        }
    }
}
Access Modifier
The first part of this is the accessor. You need to define where else this piece of code can be seen in your application. A big part of C# (and object oriented coding in general) is encapsulation. You want methods and classes to have one responsibility, and sometimes you don’t want them to be seen outside of their own class.
Public methods can be seen by everything. Private methods can be seen by only the class they’re in. There is another one called internal, but we can save that for another time.
In this particular instance, we are going to use private instead of public because the method we’re writing is in the same class as the method calling it. Therefore we can always access this method.
Error
Now, if you’re following along, you might notice that you have an error in your application. One that reads similar to:
“An object reference is required for non-static field..”
Our Main method is static. As we went over previously, this means it’s not an object that can be created. Our GetResponse method is not static. Therefor it would really need to have a new Program() object initialized. We don’t want to deal with creating new objects, yet. We just want this method to work. So we have to make it static, just like the Main method.
Note: There are some very serious limitations with using static methods. In this case we’re just making something that works similar to our PowerShell function. In the future we’ll look at better ways of writing more complex code.
So our code should now look like this:
private static void GetResponse(string name, int number)
{

}
Compared to:
function Get-Response {
    param(
        $Name,
        $Number
    )

}
Return type
We are using a return type of Void. Just like the default Main method, we’re only going to write to the console. We’re not returning any data.
Input parameters
In our PowerShell code we had a param() block that we set our parameters in. In C# we add them right after the method name. As C# is strongly typed, you are required to put the type of the variable before its name. Although PowerShell allows you to do so, it is not a requirement.
Add Working Code
Ok! Hopefully you’re still awake. We’re getting to the part of our code that does the real “work”.
That part in PowerShell looks like this:
    $MyName = "brAIn"

    "Hello $Name"
    "My name is $MyName"
    "You asked me to count to $Number. Here goes!"

    for ($i=0; $i -le $Number; $i++) {
        "$i"
    }
Variables
In PowerShell, variable declarations start with a $. C# variables either start with var or their specific type. So the equivalent of the first line in C# would be:
var myName = "brAIn";
General Guideline: In C# your private variables start with a lowercase letter. Public properties start with an uppercase. We’ll talk more about this kind of thing another time, but, if you’re using the latest version of Visual Studio, it should catch quite a few of them for you.
String Variable Interpolation
In PowerShell string interpolation is very simple. As long as you use double quotes, you just put the variable in it as normal and it will evaluate it for you. C# is different. It requires you to prefix the string with a $ and put expressions or variables inside of curly braces like this:
$"Hello {name}"
Ending your statements
In PowerShell, you just need to put each expression on a different line. You don’t need to close the statements with any symbol. In C# you have to close them with a semi-colon.
Writing To Console
And you’ll need to actually tell it to write out to the console, instead of just surrounding something in quotes and leaving it to PowerShell to know what you want.
So the first part of our method will need to look like this:
    var myName = "brAIn";

    Console.WriteLine($"Hello {name}");
    Console.WriteLine($"My name is {myName}");
    Console.WriteLine($"You asked me to count to {number}. Here goes!");
The For Loop
The loop doesn’t change from PowerShell to C#, with the exception of our operator. In PowerShell our comparison operators are a combination of two letters, such as -le for “less than or equal to”. In C# we use <= to refer to the same type of comparison.
for (int i = 0; i <= number; i++)
{
    Console.WriteLine(i);
}
Complete Method Code
Our new method now looks like this:
private static void GetResponse(string name, int number)
{
    var myName = "brAIn";
    Console.WriteLine($"Hello {name}");
    Console.WriteLine($"My name is {myName}");
    Console.WriteLine($"You asked me to count to {number}. Here goes!");

    for (int i = 0; i < number; i++)
    {
        Console.WriteLine(i);
    }
}
Completing The App
Now we need to call it from our Main method. We’ll get rid of the
Console.WriteLine("Hello World!");
call and replace it with a call to our new method.
Main Method Input
Remember our main method only takes an array of string input?
static void Main(string[] args)
From the console that’s all it is going to see. So we’ll need to do a little conversion. We’ll expect users to put in a name as the first argument, and a number as the second argument.
So we’ll look for args[0] and args[1].
Converting a string to a number
We’re going to use a static method of the int class to convert our second argument to a number.
int.TryParse(args[1], out int number);
This will look at the second value in args, see if it can turn it into a whole number, and then output that into a variable named “number”.
Our Method Call
GetResponse(args[0], number);
Final Code
using System;

namespace SimplebrAIn
{
    class Program
    {
        static void Main(string[] args)
        {
            int.TryParse(args[1], out int number);

            GetResponse(args[0], number);
        }

        private static void GetResponse(string name, int number)
        {
            var myName = "brAIn";
            Console.WriteLine($"Hello {name}");
            Console.WriteLine($"My name is {myName}");
            Console.WriteLine($"You asked me to count to {number}. Here goes!");

            for (int i = 0; i <= number; i++)
            {
                Console.WriteLine(i);
            }
        }
    }
}
Running
So a quick way we can run this is by using one of the dotnet commands. We need to do so from within the project directory, though. That would be the directory where your .csproj file is located.
Once there you can use the “dotnet run” command, plus arguments, to compile and run our app on the fly.
In our case I’m going to use
dotnet run Bob 25
And here’s the output:
Ready For World Domination!
Maybe not quite. But hey, you now have a working C# console application ^__^
Stay tuned for the next part in the series. We’re going to look at some ways we can change this code to be more object oriented. Until then, happy coding and happy days to you all!